Prettify your screenshot using imagemagick
Posted on Thursday, 06 August 2020
5 minutes to read
Introduction
Let's make our screenshot prettier by using a software called Imagemagick. In this post, we will add some fancy effects like backdrop, shadow, border, and rounded corner with a simple script.
Prerequisite
Before we make the script, there are a few things that you'll need to prepare.
- Imagemagick - obviously
- Any screenshot software - I use flameshot
- Clipboard - I use xclip (optional)
After having all of that, let's make the script.
Making The Script
Backdrop
Backdrop is actually just a really thicc border. Here's how to do that on imagemagick.
convert source.png -bordercolor white -border 10 result.pngYou can adjust the color by changing the bordercolor value. I use white because it looks nice to me. You can use HEX, RGB, and RGBA format. For more references, go to their website.
To adjust the thickness of it, you change the border value. I use 10 here because it's not too big and it's not too small for me.
Border
Previously, we made a thicc border as a backdrop, this time we make a thin border before the shadow
convert source.png -bordercolor white -border 4 result.pngIt's basically the same, just with a different value.
Shadow
To give you screenshot a shadow is quite simple. Here's how to do it.
convert source.png \( +clone -background black -shadow 40x5+0+0 \) \
+swap -background none -layers merge +repage result.png; \
To change the shadow color, adjust the first background value. I use black because black shadow is the only one that is acceptable to me. The 40 here is the shadow opacity, you can change it to whatever you like. The shadow radius here is 5. This will add to your backdrop thickness. If you have 10 of backdrop and you have 5 of border radius then you'll end up with 15 of backdrop.
Rounded Corner
It's quite a lengthy one, but don't worry. The only thing we'd change is the border radius.
# rounded corners
convert /tmp/image.png \
     \( +clone  -alpha extract \
        -draw 'fill black polygon 0,0 0,5 5,0 fill white circle 5,5 5,0' \
        \( +clone -flip \) -compose Multiply -composite \
        \( +clone -flop \) -compose Multiply -composite \
     \) -alpha off -compose CopyOpacity -composite /tmp/image.png
The border radius here is 5. Change every 5 to whatever you want like 10 for example but 5 is the sweet spot for me. For more technical explanation and details you can refer to their website
Combining Them All
Those are all the parts that we need. Let's combine them together. Make a file called whatever you want and make it executable by using chmod +x filename and edit the file.
#!/bin/dashI use dash for my script, but bash or zsh will do just fine. I don't know if it'll work with fish though, I suppose it'll work just fine. Add your screenshot program to take the image that we will be using. I'm using Flameshot so it will look like this.
#!/bin/dash

flameshot gui --raw > /tmp/image.png
I store the image on /tmp directory because I will copy it to my clipboard and won't be using the original image.
#!/bin/dash

flameshot gui --raw > /tmp/image.png

# rounded corners
convert /tmp/image.png \
     \( +clone  -alpha extract \
        -draw 'fill black polygon 0,0 0,5 5,0 fill white circle 5,5 5,0' \
        \( +clone -flip \) -compose Multiply -composite \
        \( +clone -flop \) -compose Multiply -composite \
     \) -alpha off -compose CopyOpacity -composite /tmp/image.png
The first effect I apply is the rounded corner and store the result in /tmp/image.png.
#!/bin/dash

flameshot gui --raw > /tmp/image.png

# rounded corners
convert /tmp/image.png \
     \( +clone  -alpha extract \
        -draw 'fill black polygon 0,0 0,5 5,0 fill white circle 5,5 5,0' \
        \( +clone -flip \) -compose Multiply -composite \
        \( +clone -flop \) -compose Multiply -composite \
     \) -alpha off -compose CopyOpacity -composite /tmp/image.png

# shadow
convert /tmp/image.png \( +clone -background black -shadow 40x5+0+0 \) \
+swap -background none -layers merge +repage /tmp/image.png; \
Next one is the shadow. I don't use the small border because it looks weird on a smaller screenshot. You can use it if you like.
#!/bin/dash

flameshot gui --raw > /tmp/image.png

# rounded corners
convert /tmp/image.png \
     \( +clone  -alpha extract \
        -draw 'fill black polygon 0,0 0,5 5,0 fill white circle 5,5 5,0' \
        \( +clone -flip \) -compose Multiply -composite \
        \( +clone -flop \) -compose Multiply -composite \
     \) -alpha off -compose CopyOpacity -composite /tmp/image.png

# shadow
convert /tmp/image.png \( +clone -background black -shadow 40x5+0+0 \) \
+swap -background none -layers merge +repage /tmp/image.png; \

# white backdrop
convert /tmp/image.png -bordercolor white -border 10 /tmp/image.png
The last effect I apply is white backdrop. Next step is optional, but if you want to you can add it as well.
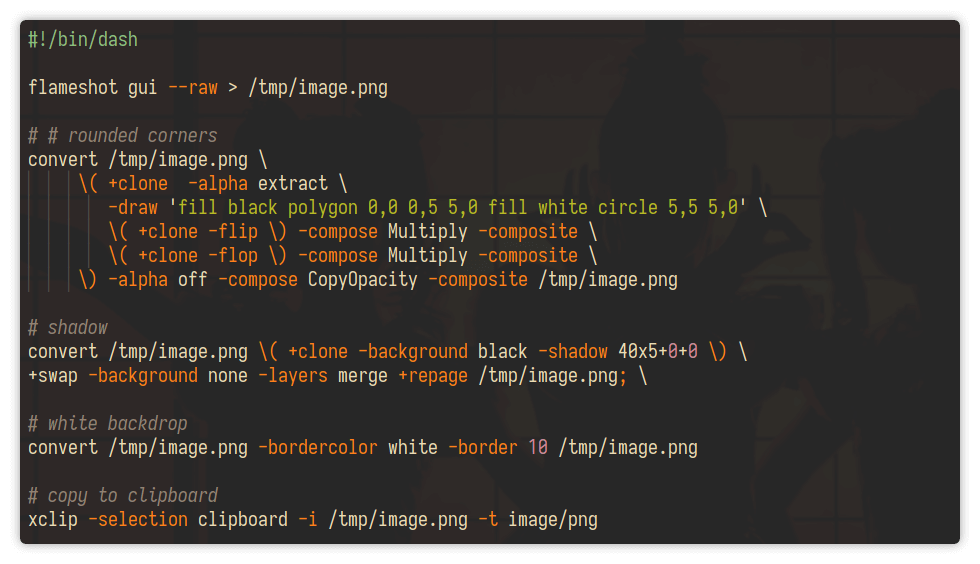
#!/bin/dash

flameshot gui --raw > /tmp/image.png

# rounded corners
convert /tmp/image.png \
     \( +clone  -alpha extract \
        -draw 'fill black polygon 0,0 0,5 5,0 fill white circle 5,5 5,0' \
        \( +clone -flip \) -compose Multiply -composite \
        \( +clone -flop \) -compose Multiply -composite \
     \) -alpha off -compose CopyOpacity -composite /tmp/image.png

# shadow
convert /tmp/image.png \( +clone -background black -shadow 40x5+0+0 \) \
+swap -background none -layers merge +repage /tmp/image.png; \

# white backdrop
convert /tmp/image.png -bordercolor white -border 10 /tmp/image.png

# copy to clipboard
xclip -selection clipboard -i /tmp/image.png -t image/png
I added the last line to copy the result into my clipboard so I can easily paste it anywhere and don't have to delete the screenshot when I no longer need it. Here's the result.
It's not obvious because my website background is white. But you can still see the shadow. Here's another variation.
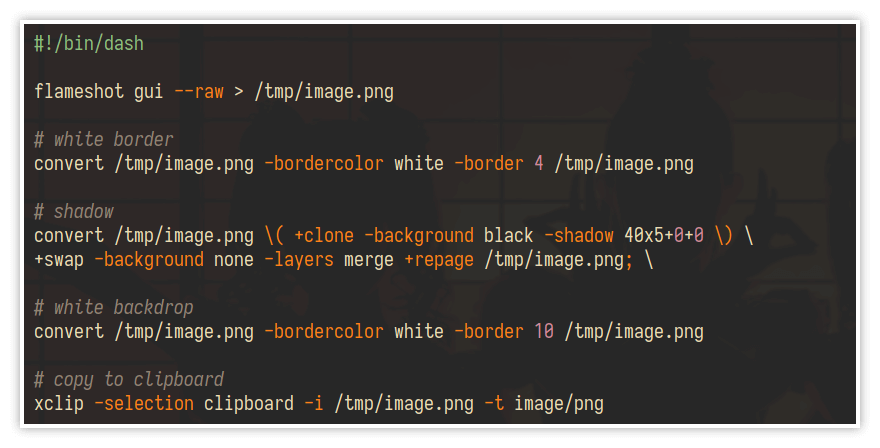
This one is more obvious because there's a small white border there.
Conclusion
Imagemagick is a powerful CLI tools to manipulate an image. It can do so much more, if you're interested on that then you can go to their website for some advanced guide. That's all for this post, thanks for reading and have a nice day ツ
linux